Set up an Underlay Port Group
By default, an Airwall Gateway has two port groups. One underlay port group assigned to Port 1 and one overlay port group assigned to the remaining ports. On virtual and cloud Airwall Gateways, you may be able to add additional ports by creating new virtual network adapters on the hypervisor. Some hardware models allow you to add new ports by inserting port expansion modules.
All non-cellular ports allow adding VLAN sub interfaces.
You may want multiple underlay port groups on wireless Airwall Gateways. You can configure one port group for the wireless port and one for a wired port and assign different priorities to the two port groups. This allows the Airwall Gateway to automatically fail over to whichever port is available based on the assigned priorities.
It can also be useful to have multiple wired underlay port groups to allow an Airwall Gateway to communicate on separate networks at the same time. For example on a relay Airwall Gateway, you could configure one underlay port group on a DMZ and the other on the corporate network (multi-homing).
-
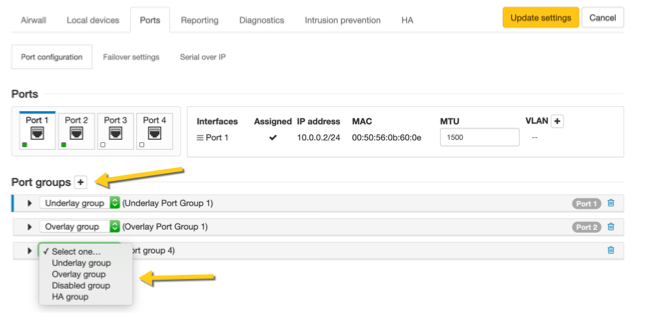
In the Conductor, go to the Airwall Gateway on which you want to configure port groups, go to , and select Edit Settings.
-
Select an Underlay port group you want to use, or add a new port group by clicking the + to the right of Port groups, and select Underlay group.
-
Click the arrow on the left of your Underlay group header to expand the settings for that Port Group.
-
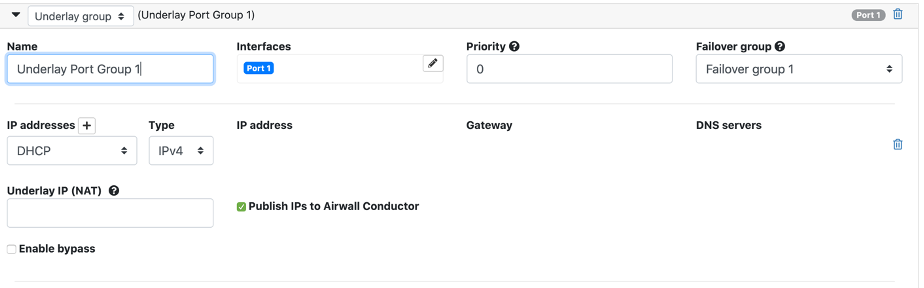
Enter a name for the group, and under Interfaces, select the port interfaces for the group.
-
Under Priority, set the priority for this underlay port group. 0 is the highest priority. The Airwall Gateway will always try to use the underlay port with the lowest priority value if the network is available.
-
(Optional) Under Failover group, select the Failover group. Failover groups allow traffic monitoring for a given traffic type (Conductor traffic or data plane traffic). The failover groups define how to monitor the availability of the port groups contained in the failover group, and when port groups should fail over to another port group. Only a single port group is used at a time. Failover groups are configured separately on the Failover settings tab.
You can select Stand-alone to make the port group permanently available independent of any other underlay port group.
-
Under IP addresses, click the + to add an IP address. You can choose between DHCP or static address configuration. The Underlay Port Group IP address may be already configured if you configured its initial IP address when setting up the Airwall Gateway.
-
Under Underlay IP (NAT), If this Airwall has a public IP, you can add it here. Remote Airwall Edge Services will then attempt to connect to the public IP instead of the IP configured on the underlay port group.
-
Check Publish IPs to Airwall Conductor to advertise the IP address of this underlay port group to remote Airwall Edge Services to build secure tunnels. In a hub and spoke Airwall deployment you may want to leave this unchecked on the spoke Airwall Gateways if tunnels are always established from the spoke to the hub. This configuration reduces network traffic related to IP address advertising.
-
Check Enable bypass to allow traffic from protected devices behind this Airwall Gateway to reach destinations on the underlay network. Traffic to these destinations can be configured just like normal overlay traffic using the policy editor. You can configure bypass destinations on the Devices tab. Clear this box to disable bypass traffic over this underlay. You can only enable bypass on a single underlay port group on each Airwall Gateway.
-
If you have enabled bypass, you can choose to Enable source NAT. This option replaces the source IP of packets leaving the Airwall Gateway with the IP of the port group, and may be required to allow routing between the IP addresses on the device network and the bypass destinations.
-
If your network requires it, you can add additional static routes as needed.
-
Select Update Settings.