Walkthrough -- Send Expiring Guest Access Invitations
In this walkthrough, you set up and send Airwall Invitations that provide guests with 4 hours of access to your Airwall secure network, after which it automatically disables all communications.
One way you can use Airwall Invitations to group and configure people’s devices as they accept the Airwall Invitations and connect to your Airwall secure network is to expire people’s access to your secure network at a time you set.
Setting access that expires is useful when you have people, such as vendors or guests, that you want to give access to, but you want to enforce a time limit automatically.
You can modify this walkthrough to create your own rules for automatically configuring Airwall Agents and Servers using Airwall Invitations.
Walkthrough Overview
To create Airwall Invitations that expire, you need to:
-
Create two Tags – One to grant access and one to remove access. For
example, if you’re creating guest access, you might create tags of
Guest Access4hrandGuest Disabled. -
Create two Smart Device Groups –
-
Grant Access Group – Create a rule that adds devices to the
group if they have the
grant accesstag you created. For example, you might create a Smart Device Group calledGuest Accessand create a rule that adds devices tagged withGuest Access4hr. -
Remove Access Group – Create a rule that adds devices to the
group if they have the
remove accesstag you created. For example, you might create a Smart Device Group calledDisabled Guestswith a rule to add devices tagged withGuest Disabled.
-
Grant Access Group – Create a rule that adds devices to the
group if they have the
-
Add the Grant Access group to the appropriate Overlays – Add the Grant Access group to the Overlays
that give the people’s devices access to the resources they need.
Note: Do NOT assign the
Remove AccessDevice Group to any Overlay Network. This Device Group is added as a negative to any other Smart Device Groups to prevent accidentally giving a guest access to resources they shouldn’t have. Essentially, this Device Group is for guests whose access has expired. -
Hold or Revoke the
Remove Accessdevice group – For people that have been moved to theRemove Accessgroup, you can choose to:- Hold – Allow the guests to stay until they require access again.
- Revoke –You can revoke the Airwall Agent or Server licenses for the people in the group, which returns the agent and server licenses back into the license pool.
API Tip – You can revoke agents and servers in the API: Query for Airwall Agents with the “remove access" tag and revoke them if they no longer hold the grant access tag.
-
Add the “remove access" and grant access tags to the Airwall Invitations for the
people you want to expire access
API Tip – You can also set the tags and send Airwall Invitations in the API.
Step 1: Create Guest Access tags
The first step to do is create tags for visitors to your Airwall secure network. You need to create two tags, one for guests with 4 hr access, and one for guests whose access has expired.
To create a tag for guests with 4 hr access:
-
In your Conductor, open Tags
 in the upper right
corner.
in the upper right
corner.
-
Select Create tag and name the tag
GuestAccess4hr.
Note: Make sure the tags you create are not being used elsewhere in the Conductor, as manually-added tags are also removed if they are the same as these conditional tags.
- Under Who can use this tag?, set it to Any Admin users.
- Under Tag color scheme, choose a color. This example uses orange.
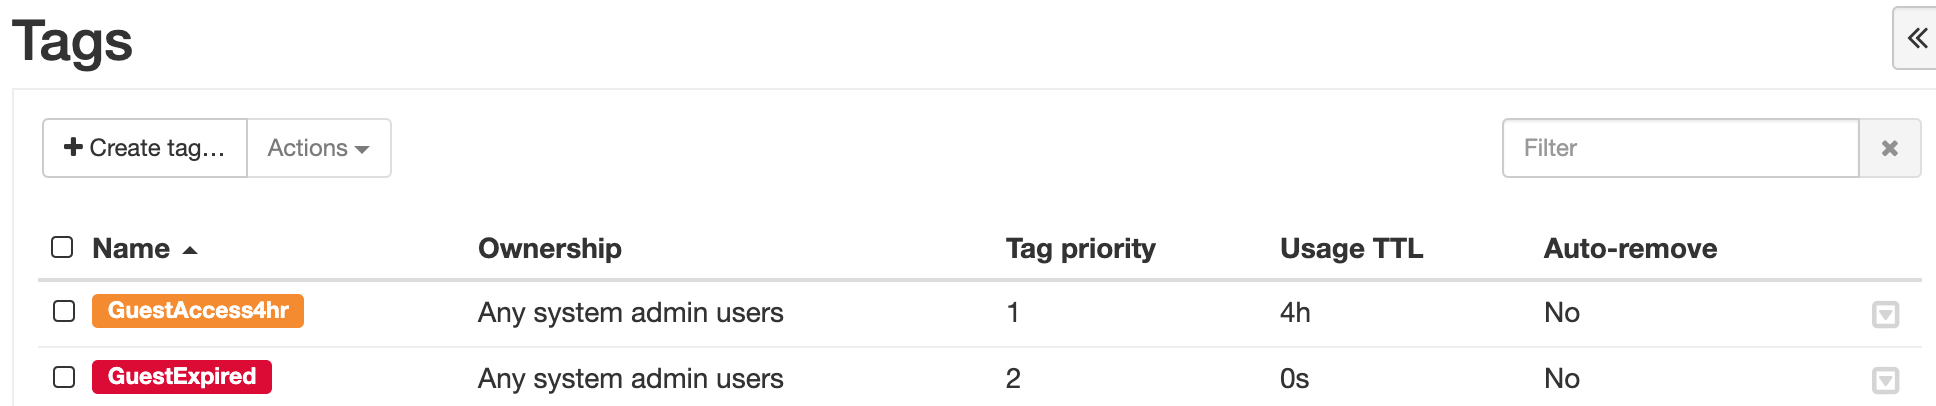
- Set Tag priority to 1. This tag takes priority over the Guest Expired tag.
- Set Expire tag usage after this duration to 4h. If you want to customize the time period, supported units are: y, M, w, d, h, m, s (default) with no spaces. For example: 4h30m50s.
- Click Create.
To create tag for guests whose access has expired:
- On the Tags page, select Create tag, and name the tag GuestExpired.
- Under Who can use this tag?, set it to Any Admin users.
- Under Tag background color and Tag text color, choose colors, and check the example for the result. This example uses red.
- Set Tag priority to 2. This tag takes secondary priority to the GuestAccess4hr tag.
- Leave Expire tag usage after this duration set to 0s (this indicates the tag is permanent).
- Click Create.
Your tags page now has these two tags. Notice that the Expire tag usage after this duration setting is shown under Usage TTL:
Step 2: Create Guest Access Smart device groups
Set up two Smart device groups that add people's devices as they connect.
Smart Device Groups are groups that are dynamically created and updated based on the rules you set up for the group. Along with tags, they allow you to automatically add devices people are connecting to groups based on what their Airwall Agent or Server has been tagged with.
You need to set up two groups that match your tags: one for guests with 4 hr access, and one for guests whose access has expired.
To create a Smart Device Group for guest 4 hr access:
- In your Conductor, go to the Devices page.
- Open the Device groups tab and select Create group.
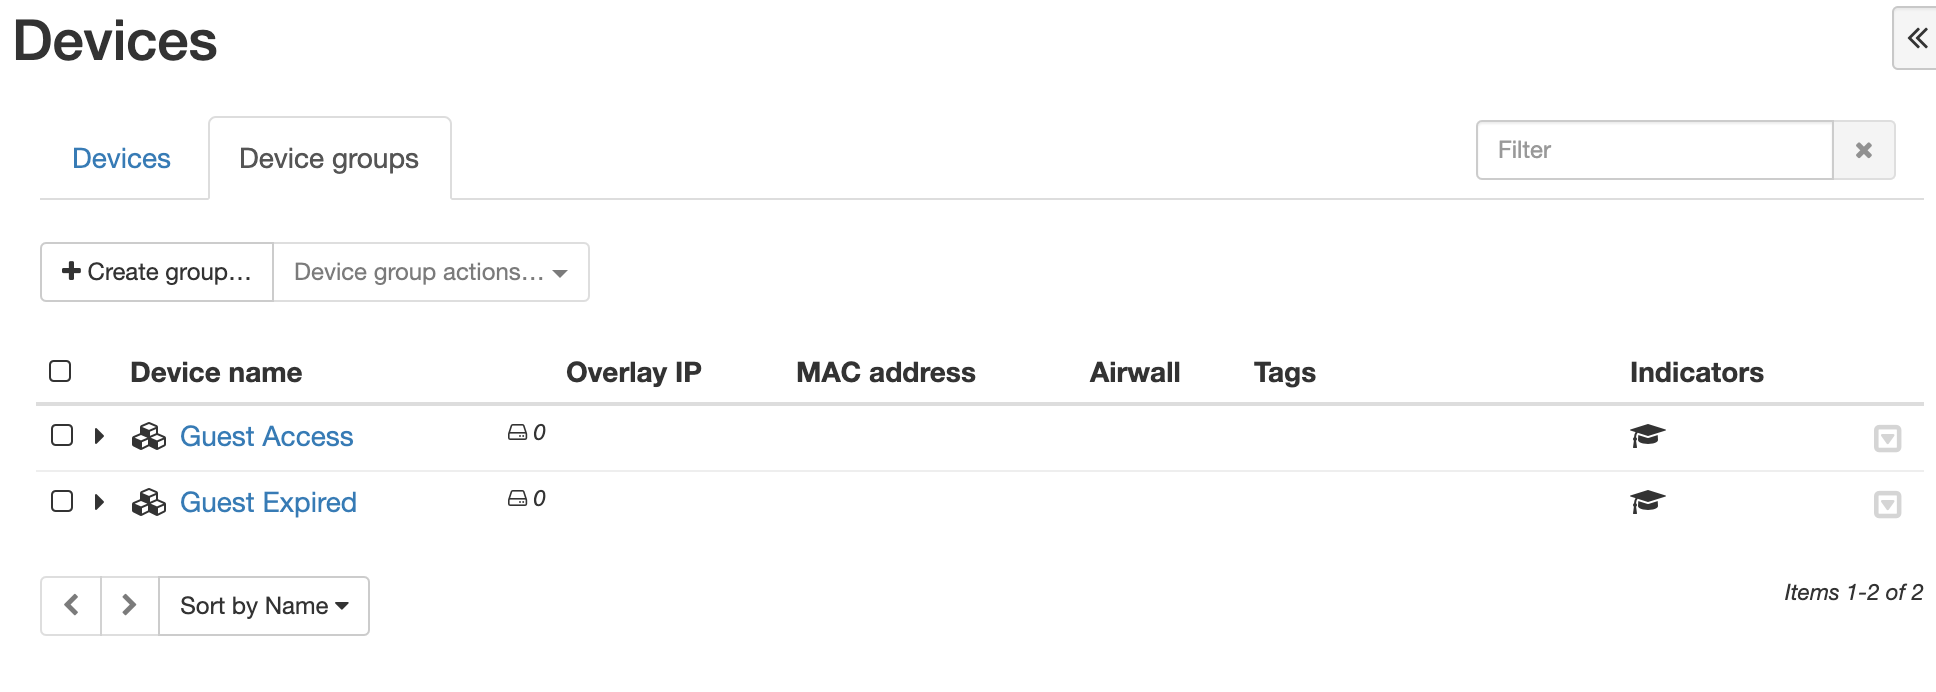
- On the Device groups page, name the group Guest Access.
- On the Guest Access group page, under Advanced properties, check Use rules to add devices. This adds the Rules tab to the page.
- Uncheck Ignore auto-discovered devices until accepted.
- Open the Rules tab, click Edit rules, and then click Add rule.
- In the Rule Type column, open the dropdown menu and select Tag Match. (Click the arrows to open the dropdown menu.)
-
In the Arguments column, select Airwall, and then right below the Arguments menu, click
the edit icon
 .
.
-
Choose the GuestAccess4hr tag, then click the check
icon
 to set the tag.
- Click Create.
To create a Smart Device Group for guests whose access has expired:
- In your Conductor, go to the Devices page.
- Open the Device groups tab and select Create group.
- On the Device groups page, name the group Guest Expired.
- Under Advanced properties, check Use rules to add devices. This adds the Rules tab to the page.
- Uncheck Ignore auto-discovered devices until accepted.
- Open the Rules tab, click Edit rules, and then click Add rule.
- In the Rule Type column, and select Tag Match. (Click the arrows to open the dropdown menu.)
-
In the Arguments column, select Airwall, and then right below the Arguments menu, click
the edit icon .
-
Choose the GuestExpired tag, then click the check
icon to set the tag.
- Click Create.
You now have two Smart Device Groups (indicated by the  icon) for Guest Access:
Step 3: Create an overlay for Guest Access
Creating a new overlay used for guest access gives you the most control over the resources guests have access to.
- In your Conductor, go to the Overlays page.
- Select New overlay network.
- Under Select Network Topology, select Manual and click Next.
-
On the Create New Network page, name the overlay
Guest Access, and click Finish. -
On the new
Guest Accessoverlay page, by Add devices, click the plus sign (+). -
Check the
Guest Accessgroup, and then also add the devices or device groups that you want guests to have access to and click Add devices. -
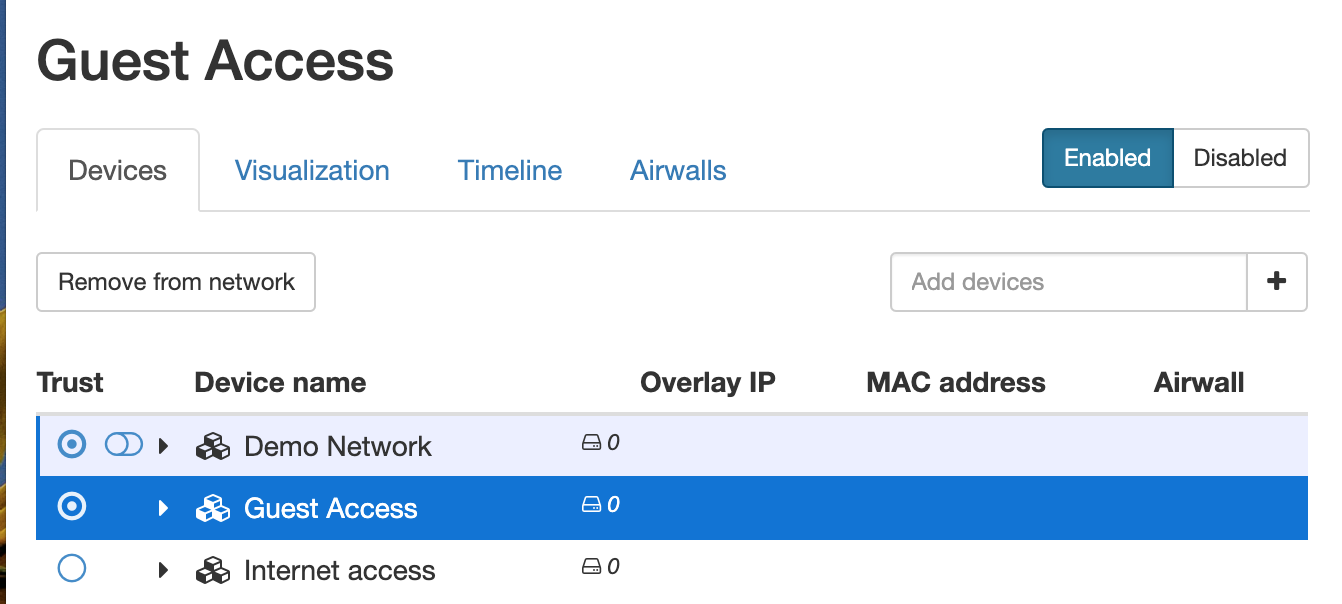
Set trust between the
Guest Accessgroup and the devices you want them to have access to:
In this example, the Guest Access group has access to the Demo
Network but cannot access the Internet access group.
You now have all of the pieces in place and are ready to send an invitation.
Step 4: Set up and send Airwall Invitations to guests
You can now create and send an invitation that automatically grants guest access to Airwall Agents and Servers connecting through that invitation.
- In your Conductor, go to the Airwalls page.
- Open the Airwall Invitations tab and click Create Airwall Invitations.
-
On the Send Airwall Invitations page, enter at least one
email address for a guest, and click the Add icon .
- Click Next.
- Add a name for the profile to create on the Guest’s Airwall Agent or Server.
- Under Install package location, enter a link for the Airwall Agent to install. You can link to the installation package for the type and version of Airwall Agents you want them to use, or link to the latest Airwall Software Downloads page here //webhelp.tempered.io/webhelp/content/topics/downloads_latest.html.
- Check the Conductor URL. It should already be added by default.
-
Under Activation code expiration date, leave the default
settings and click Next.
Note: This is the expiration date for the invite only.
-
Under Tags, click the Edit icon , and select the
Guest
                        Access4hr
tag. -
Click the Add an entry box to open the tag list again
and choose
Guest Expired. With bothGuest Access4hrandGuest Expiredtags in the list, click on the add icon .
- Click Next.
- Review, add, or edit the email addresses or the invitation.
- To send the invitations, click Finish.
As people accept your invitations, they are automatically given access for 4 hrs, and then removed from all access. For more details on how it works, see How Expiring Access Works.
What to do next
With access being granted and revoked automatically, all that you need to do to give new guests access is send them an invitation using the invitation you just created as a template. What you can do now:
- Manage your Guest Expired devices – You will probably need to eventually manage your guest expired devices to free up licenses or give them additional access.
- Reuse Guest Airwall Invitations - You can also reuse the invitation you sent to quickly invite new guests. For more information, see Reuse Airwall Invitations.
- Renew Guest Access – You can renew guest access for an additional 4 hours by just retagging the person’s device. For more information, see Renew Access for Guest Expired devices.
Manage Guest Expired devices
For your guests in the Guest Expired Device Group, you can:
- Leave them alone – Keep them in the GuestExpired group indefinitely (this holds the license for them).
- Revoke access – Airwall Agent or Server and return the license to your pool of available licenses. For more information, see Revoke Access for Guest Expired devices.
- Renew access – Tag them with the GuestAccess4hr tag again to give them 4 hours of access again. For more information, see Renew Access for Guest Expired devices.
Renew Access for Guest Expired devices
- In your Conductor, go to the Airwalls page.
-
On the Airwalls tab, click the Tags column header to sort by Tags,
and find the devices that are tagged with
GuestExpired, but notGuestAccess4hr. - Check the box to select the Airwall you want to renew access for.
- At the top of the page, select Airwall actions, and then Edit Tags.
-
Under Add Tags to selected items, click the box with
Add an entry, select the
GuestAccess4hrtag, and then click the check to add the tag. - Click Update. The access countdown begins again, giving the guest 4 more hours of access.
Revoke Access for Guest Expired devices
- In your Conductor, go to the Airwalls page.
-
On the Airwalls tab, click the Tags column header to sort by Tags,
and find the devices that are tagged with
GuestExpired, but notGuestAccess4hr. - Check the box to select the Airwalls you want to revoke access for.
- At the top of the page, select Airwall actions, and then Revoke.
How Expiring Access Works
- Each person’s Airwall Agent or Server is
automatically added to both the
Guest Accessand theGuest Expiredgroups. - Because the
Guest Accesstag takes priority, they are automatically added to theGuest AccessSmart Device Group, and white listed to the devices or groups in your Guest Overlay for communication. - The countdown for their 4 hr access starts.
When the 4 hrs is up, the Guest Access tag is automatically removed from
the client, and the Guest Expired tag then takes priority and moves the
Airwall Agent or Server to the
Guest Expired smart device group, removing them from access to any
overlay.